Saturday, 1 December 2012

Have a Seat

    All these chairs and no where to sit.


The shop is full of them (27 in all) but they will soon be at Bob and Sue's restaurant.

 
Shannon and I spent a whole day stripping and sanding the old finish off the wood backrests and seats. It was so romantic.


Apply dark walnut stain and top with poly. Every flat surface in the shop was covered with chair parts for a couple of days.

 Shannon did a great job touching up the black on the chair frames. 
Thanks to Alyssa for having all the wood parts taken off the chair frames already. That saved a lot of time.

All done, looks nice eh?

These should be ready to leave by the end of the day

   I was told these chairs came from the Old Fire Hall in Toronto. For those who may not know The Old Fire Hall on Lombard street was the home of the Second City comedy troupe for twenty three years. Many Canadian's honed their comedic craft there and launched the careers of Dan Aykroyd, John Candy, Joe Flaherty, Eugene Levy, Andrea Martin, Mike Myers, Catherine O'Hara, Gilda Radner, Martin Short and Dave Thomas and others.

  In 2001 the building became home to a cancer support group until it moved in 2011. It was named Gilda's Place in honor of Gilda Radner who lost her battle with cancer.

  Second City lives on though, it just marked fifty years of funny. Take in a show sometime.

Thanks for reading
Ken

Monday, 12 November 2012

Just a few touchups

I don't know how this post ended up here as I posted it way back in March or April but here it is at the top of the blog. Enjoy it again, like a second cup in the morning.

 Last week I delivered a buffet cabinet to a very happy customer. In the hallowed space which the buffet now stands there was once a china cabinet. The cabinet was nothing special just run of the mill veneered parts screwed together in a factory years ago.

  I agreed to deliver it on my return trip to her daughter as she was taking ownership of the china cabinet and planning to refinish it. During the journey I was required to make frequent stops at various shopping outlets. The trip through the parking areas and streets were akin to a nice jaunt across the Australian outback whilst chasing down kangaroo's.

   On arrival at our last stop before the trip home I found that one of the lower cabinet doors had completely freed itself from it's hinges. I neglected to tie the door handles together to keep them closed. Silly me.

   Well I can't leave it like that. So home it came with me and landed in the shop for some touch ups. Figured I might as well strip the finish for her and save her some time and mess. She also wanted the bonnet on top removed. My eyes wandered over the cabinet and of course I detected some things that could use a little upgrading.


This is how the cabinet looked when it arrived Sunday night.

The back of the cabinet was in rough shape and coming loose of the back. It also is not properly trimmed out ragged edges everywhere on the rear face.

  This is the cabinet Monday after I saw a couple of spots that could use improvements. The veneers are coming apart in the plywood on the lower doors. I'll make some simple new ones. Also a new back frame and panel. The base of the upper part has a huge hole in the veneer, need to fix that. This is as far as I got as I was putting a load of rough lumber into the shed after removing it from the old barn in the orchard and cleaning up some junk around the yard all day.

Here we are on Tuesday morning. It is easier to strip the finish if I take the top cabinet apart. Rear panel on the lower part is the same story as above and the bottom shelf is a sorry looking thing and the glue is letting go on the joints.

 I'll huff and I'll puff and blow your house down. 
Yup, just making a couple improvements

   For the rest of this day things are going well. The side assemblies are stripped and clean as well are the shelves for the upper cabinet and it's sides. The bottom shelf of the lower cabinet has been improved and reassembled in it's frame. The dust shelf frame under the drawer space is reassembled as well. I'll finish the day laying out some rabbets on the rear legs to accept the new back panel assembly and collect my thoughts.

This is Wednesday

  All parts stripped of old finish. New back panel installed and lower cabinet back together. Reshaped the bottom of the side panels. New skirt on the bottom with cloud lifts giving it that Greene and Greene look. Also the section on top was replaced as the old one didn't go with the new motif. I'll have to go back and pick up the drawer though, it was still full when we picked this up.

This is what things should look like when it is back together.

  Unfortunately I will be out of the shop Thursday and Friday. But more fortunately Shannon and I will be leaving for Cuba on Saturday for seven days. Ola.

thanks for stopping by.
Ken


Saturday, 10 November 2012

Soon We Will Dine

  The next part of the table build was to glue some boards together to make that large top. When finished the top would measure 8' 4" long and 3' 6" wide and a little more than an inch thick.

  To glue the boards together the edges must be straight. I called on my friend Paul to give me some help running the long boards over the jointer and through the thickness planer. It was a good afternoons work. Thanks again Paul.

  This is a very wide top and I broke it into 3 glue ups. Two glue ups to make each half then a third glue up to mate the two halves into one big top. This is the largest top I have put together in this shop.

Here is one of the halves being clamped together. Nice pic Shannon.

Dry fitting the two halves showed that the mating edges need some more straightening. Going to have to break out the hand plane for this part.

 More clamps, I need more clamps.....
In this picture you can see the pairs of wooden cauls that run across the boards to keep things flat while clamping. They have a fair curve (bow) on them that comes tight to the boards when you clamp them together.

  This table is very wide. (I am reminded of this by it's weight every time we handle it). And one good way to help keep things flat is using breadboard ends. Also looks cool. Underneath the top there are four boards that run across the width of the table. Two to help keep things flat and two that attach the top to the trestle ends.

These four tenons will fit into corresponding mortises in the end board to prevent it from coming off when the table is lifted or diners are leaning on it. Space on each side of the mortises allows the top to expand and contract across it's width.

Lots of adjusting of tenon thicknesses here to make a clean fit. The shoulder plane was a very handy tool for this and was teamed up with a block plane.

Dowels are driven through holes in the end and pass through holes in the tenons that are slightly out of line so that the end board will be drawn tight to the table top keeping the joint nice and tight.
There is no glue used to affix the board to the end of the top.

A slight curve on the ends. A little more forgiving when catching your leg on the corner of the table and it looks good. Also at this point the top was smoothed and the end boards flushed up with the rest of the top. A lot of hand work with planes and scrapers. It was a good work out.

The top after staining. The satin topcoats will go on after the stain drys thoroughly.

The width of the top was hiding the nice truss work underneath. The truss was lowered 2 1/2 " and a little support post is placed on top of the truss to keep everything tight.


  Where the groove was cut in the breadboard end I cut in a walnut piece to fill the gap and visually tie the top together. The walnut piece will be free to move with the width of the top when it expands and contracts.

  Well that's it for this one, loading it into the trailer today and taking it to the new owner. Me thinks there will be libations a plenty tonight as we toast their new table.
You can find earlier posts on this table here for the 1st one and here for the second post.

As always thanks for reading
Ken


Wednesday, 7 November 2012

Carved Bowls

  A lovely maple tree stood beside our house. The tree was most likely planted just after the house was built back in the 50's. It was a beautiful tree spreading out seemingly forever shading us during the worst of the summer heat. The kids loved to climb in it and would play in the ocean of crimson leaves it dropped in the fall. So many memories........

  The old tree had developed a large split down it's middle and we feared it would eventually fall uncontrollably during a storm. We cut the tree down this last winter.

  A tree that nice must hold some beauty on the inside as well. Unfortunately the tree was not well suited for sawing out planks of lumber. It was more of a firewood tree.

  Determined to make something from this tree I picked up a Pro 4 cutter from Lee Valley for my angle grinder to try some power carving. The roughing work is done with the cutter then you move onto sanding disks of finer grits that also attach to the angle grinder. Lastly I use curved scrapers to smooth out the sanding marks.

The following pictures are some of the bowls sculpted from the old maple. She really was a beauty.

  The first bowl is small and I left a lot of the wood that lay just under the bark to let that old maple speak for itself.


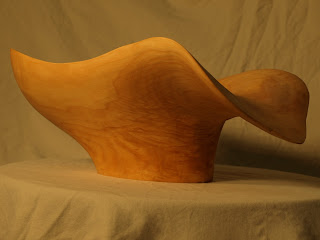
 The second bowl was a much larger piece and I discovered I could curve the edge to make these crazy swooping edge lips.


 The last bowl is very shallow. It wasn't really coming along very well then suddenly this. Reminds me of a bird.


Thanks old tree. I enjoyed working with you to reveal the beauty you worked so long to create.

I hope you enjoy them too.

Thanks for reading
Ken

The Truss for Brents Table

  Finally getting back to the table that was the beginning of everything.

  I am making progress on the truss that will span the space between the two trestle ends. More on the trestle ends here. The truss will hold the ends in a vertical position as well as support the weight of the centre of the table top.


Laminating the 1/4" thick by 3" wide pieces together to form the curves on the truss. Lots of clamps required.
I steamed some long coves and square sections to build up the trusses and fixed them in place on the  curves. The steaming allows the wood to bend and will stay in place after they cool.

The curved parts have tenons on their ends that pass through the flat board between the trestle end and the truss. The flat board will allow for an easier mechanical connection between the truss and the ends.

 The truss must be able to easily disconnect from the trestle ends to allow easier transport in case of a move. I decided to go with metal bed rail hangers that wedge together and make a very firm joint.


Although these fasteners wedge together quite well the table top will keep the truss from rising up and out of the fasteners.

Mortising a slot for the hooked side of the fasteners was a little unconventional.

Elevating work to new heights
 
Time to make the top.
For earlier posts on this item go to here.

Thanks for looking.
Ken


Saturday, 8 September 2012

Gorrila Yard Sales

  Shannon and I sometimes take a little cruise looking for garage sales. Shannon is on the hunt for decorative plates these days and I, as always, look for tools and repairable furniture.

  While pulling up to a sale one Saturday in late June, I spied what looked like some mid century modern style furniture. I figured it was some stuff from Sears that someone bought in the late 70's. 

 The table and two chairs were definitely not from Sears or even Eaton's for that matter. Solid teak all around.
The find !!!!!
  
  I sought out the person in charge of this sale which as often is the case, the lady of the household. I asked her, "How much for the table and two chairs over there". 

 She pushed back her hair and wrinkled her brow and said, "Oh, hmmm........how about ..... "

Well lets just say I couldn't buy two meal deals at Mc D's for the amount she told me.

    I backed the truck in the driveway and we started loading up. I felt like the woman in the Ikea commercial. 

  The lady of the sale said, "There used to be four chairs but two of them are long gone."  I wish those two hadn't gone but we still have the two that are left. 


 The chairs cleaned up nicely using some Murphy's oil soap. Just some juice spills and crayon on them. Oh yeah and a few dents and a nick on one leg. Not much damage considering these were made in 1979.

While cleaning the chairs I found this manufactures tag on one of them. 


 Turns out these items were made in the UK. I did a little looking around and found this reasonable explanation on G Plan. Go here for a brief explanation. 

 In a nutshell, G plan offered suites of furniture that would be available over years allowing people to purchase as they could afford too.

  Original examples of G Plan furniture are in high demand in the UK today. I suppose the pieces we purchased came across the pond with someone moving to North America.

 Following are some photos after cleaning. The table top was stripped and finished with varnish oil (danish oil finish).


Table with leaf in place. Nice new finish on the top.

I love this folding leaf, just awesome.

With the leaf hidden away

Nice chairs. The round legs make for some challenging joinery.

  These pieces now reside with a collector of modern furniture after he parted with a nice little sum for them.

  Well that Saturday was a bad day for plates but not for furniture.

As always thanks for reading.
Ken